The wort chiller

We were planning on writing about the priming and bottling of our E.S.B, but we’ve been a bit busy and we haven’t downloaded the photos from Anni’s camera. This will be an intermediate post on wort chilling.

As both Anni and I mentioned in our last posts we didn’t really chill our beer after boil and prior to fermentation. We just used a cold water bath and cooled it over the evening. This last week however, we made our own wort chiller!

Both John Palmer and Marty Nachel explain how to make your own chillers in their books. The process is quite simple, the problem, at least from my perspective was finding the correct materials in Finland. However, thanks to our friend (and fellow homebrewer) Topi, we knew where to get the main component necessary. Before going on to source of material and end result I’ll explain a bit of the idea behind the wort chiller.

The idea behind the wort chiller is basically that of a heat exchanger. You have a looping coil of metal tubing through which you pump cold water. This cold water goes through the loop of metal tubing and cools the liquid its immersed in while getting hot. This water is then poured out of the loop while more cold water is pumped from the input. Think of a slinky made with tube and you’ll kind of get the idea. Ideally, the tube used should be minimum 3/8 inches in diameter(roughly 9mm) according to Palmer. While it doesn’t have to be made out of copper, copper is a bit more maleable than other metals so its easier to work with just using your hands and doesn’t require special equipment.

Now, going onto the results and how to achieve them. What we want to get to is something like whats shown below:
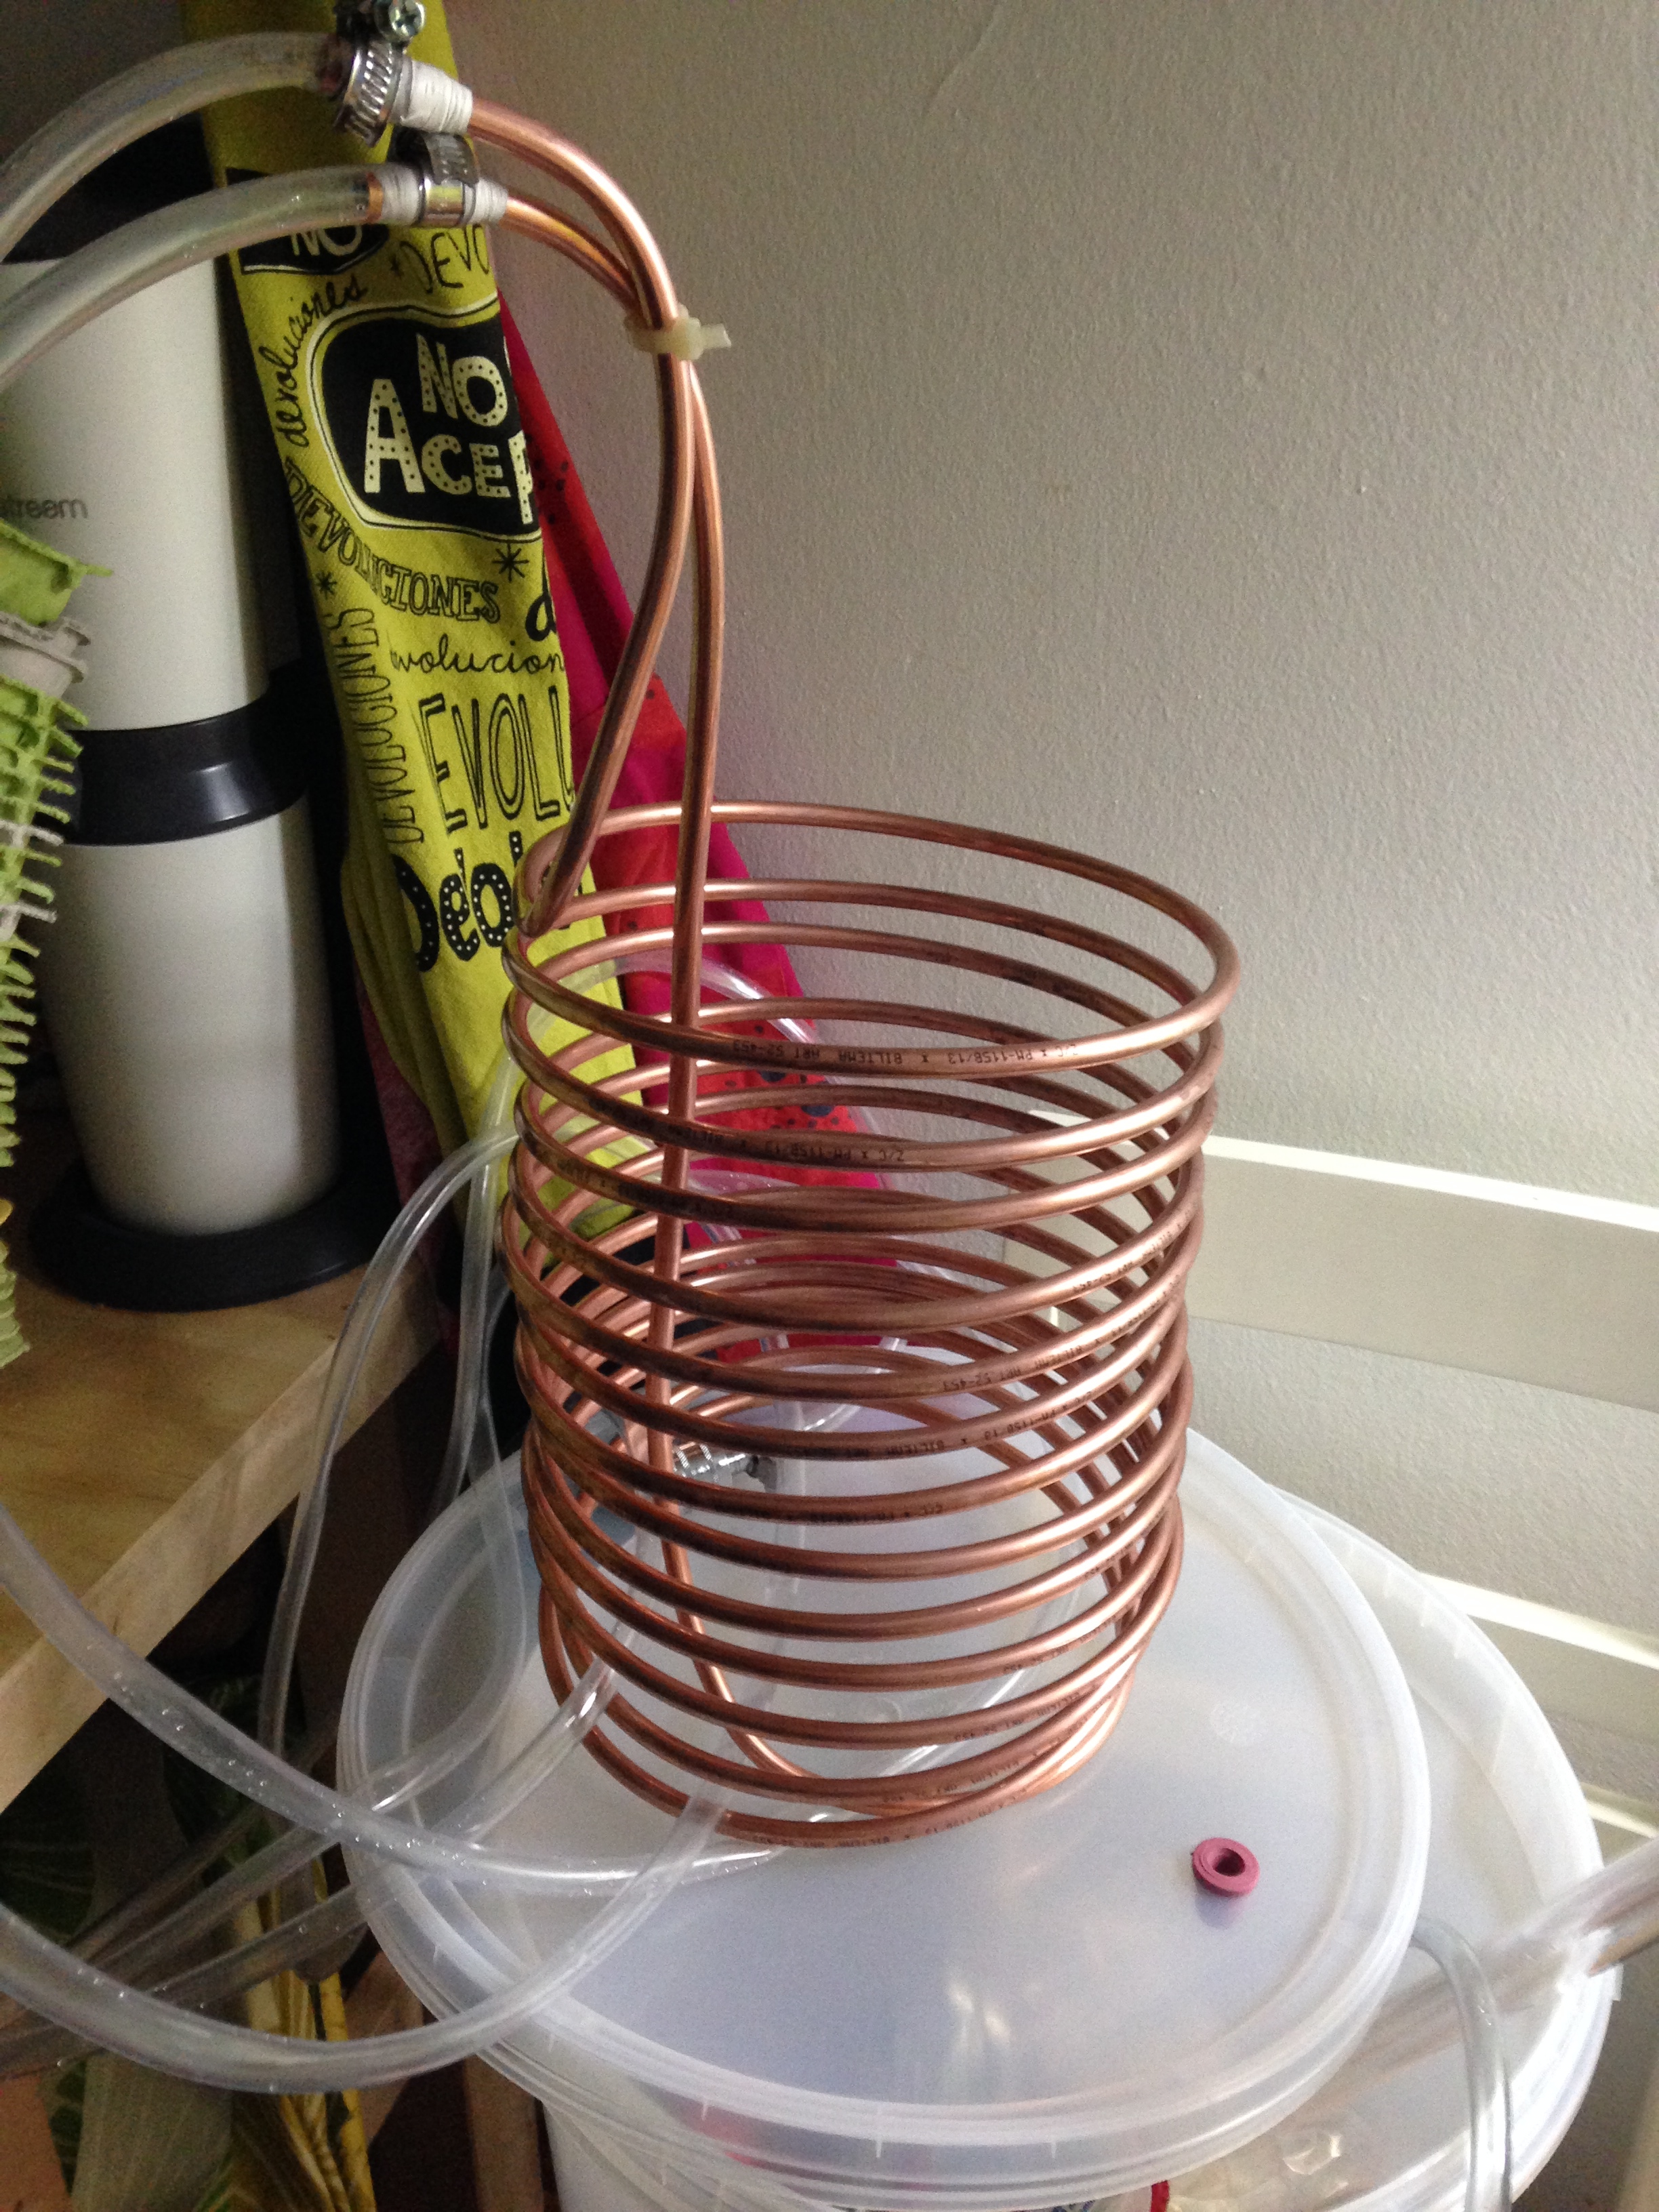
Wort Chiller

Wort Chiller

As you can see from the image above the input of the chiller starts at the top, then coils all the way to the bottom and then goes back up straight from the bottom to the exit. In order to bend the tubing I used a small pot as a reference. I didn’t want it to be too small and I didn’t want it to be too big, so I chose a pot that made a nice inner circumference in comparison to our mashing pot. Since the pot I used was quite short in height I could only wrap so much tubing nicely. The rest was a mixture manual bending and pot reference bending, that’s why the bottom part of the chiller above doesn’t look as nice. For the small bends I used a mug as support for the bending, I added some electrical tape to add some friction. I used this because if I had just used my hands I might have bent to narrowly and might have closed up the tube by accident.

As for the material used, here is the list:

  • 10m long 8mm diameter copper tubing (Polttoaineputki in Finnish), found from Biltema.
  • 10mm diameter plastic hose found from K-Rauta
  • 8-16mm clamps (Letkukiristin in Finnish) found from Biltema or K-Rauta

That’s all you need for the wort chiller, but you might also want to look into how to plug the hose to your faucet. For this I found two parts that were needed. I don’t know how they’re called in English, but they’re basically quick adapters that fit the faucet, I found the ones I needed from K-Rauta.

Notice that the diameter for the faucet connector might be different depending on the size of your faucet. So make sure you take it off and measure the diameter before you buy anything. Similarly, the hose connector was bought with the 10mm hose in mind, so you might want to buy that according to your needs.

Lastly, you might have noticed that the diameter of the copper tubing we used is only 8mm, contrary to the minimum suggested diameter from Palmer. This was merely a practical decision, it was the cheapest and easiest option available to us. In our experience it doesn’t really matter for small batches (<30 litres). We just used ours today and it worked like a charm! we cooled 20L of wort in about 30 min!

We’ll write another post soonish about our second batch of beer, and about the bottling experience with the first one. Stay tuned!

l8rs!

/R

What you need to brew

Making beer requires a bit more equipment than what you find in the average kitchen. As with any hobby, you can pretty much spend endless amounts of money on gear, but you can also get by with relatively inexpensive things.

What we have is somewhat of a compromise between the cheapest possible and easiness of brewing. We wanted a reasonable batch size, which we decided is around 20 litres. We went for the brew in a bag (BIAB) method, which saved us from having different pots for mashing, sparging and boiling. We also decided not to invest in a chiller at this stage and just see what happens.

So I’ll just go over what we have in approximately the order you need them in the process of brewing. Hopefully this is useful for those who are thinking about starting to brew their own beer.

Mashing:

  • A big pot, ours is 25 litres. We ordered it from German Amazon.
  • A brew bag. We got ours from Lappo.
  • Something to mix the mash with. We got a really big spoon from Brewcat.
  • Bringing the water to mashing temperature would have been possible with our kitchen stove, but we would not have been able to boil the wort with it, so we bought an inductive plate which we used for this step as well. Ours was this one. We chose it because it was the cheapest we could find.
  • For mashing we insulated the pot with an old camping mat and a sleeping bag. It worked surprisingly well. These we had already, but you can buy inexpensive ones at any supermarket.

Sparging:

Some sources say, you don’t need to sparge/rinse with BIAB, but we sparged through the bag anyway. For this you need an other pot to boil the sparging water in.

  • We bought a 10 litre pot for this. This was from the local department store, and it cost about 40 euros. We’ll use this for other things, like cooking and making cheese, so it was worth buying one. You can also use couple of smaller ones, or what ever you have available.
  • We used an oven grill to help, so we could lift the bag on top of the brew pot to put the water through. This we already had in the house.
  • A measuring jug was used to pour the water on the malts. This was also from the supermarket.

2014-02-01 16.14.36

Measuring:

You’ll be measuring things at several different stages during the process. I collected all measuring related equipment here under the same category instead of mentioning them at different stages. I hope this makes sense to you as well.

  • You’ll need to be able to measure the gravity of your wort to know if it has the right amount of sugars to get the alcohol percentage you’re aiming for. For this you need a hydrometer and test tube/jar. We already had a hydrometer. We bought the jar for it from Lappo.
  • Thermometer for mashing, boiling and chilling. We got a digital one from Brewcat. You can probably survive with a simpler one, or you can invest in a fancier one, which ever is your priority.
  • The downsides of getting a cheap one are, that the response time is a bit slow and the thermometer is not water proof.
  • Kitchen scale for weighing malts and hops. We already had one, it’s just a simple inexpensive one from the supermarket.
  • We also had a couple of measuring jugs, these were simple plastic ones from the supermarket. (We have 1 and 2 litre ones.)

Boiling:

  • Everything needed for this step was actually already used during the mashing.
  • As a reminder, you’ll need a big pot, something to heat it up with and a spoon or ladle to mix it with.
  • We also used mesh bags for hops, but this not necessary. They don’t cost much though, and make your life easier, so I would recommend getting some.

Chilling:

  • We pretty much skipped this step, so no insight on this yet.
  • We used our plastic laundry basket as a cold water bath for the pot. This wasn’t very efficient though, but from what we’ve heard, other homebrewers have managed to make good enough beer without a chiller. So while it is best to chill your wort, I don’t think it’s the first thing you need to worry about.
  • Well probably be attempting to make some kind of DIY chiller, and we’ll report back on it, when we’ve tried it out.

Fermenting:

  • You’ll need a bucket or a carboy to ferment the beer in. We already had a 30 litre fermenting bucket at home, so we just used that.
  • The fermenting beer will need some head space, so you can ferment approximately 25 litres in this size bucket.
  • Also a waterlock (to keep the air out, but allowing the carbon dioxide to go out) is needed. These don’t cost much, so we recommend getting a 3 piece one, because those are easier to clean.
  • After the wort has been chilled you need to be very careful with hygiene. So you need something to sanitise everything that touches the chilled wort, including the fermenter. We used Star San for this. It was also ordered from Brewcat.

Bottling:

  • We haven’t bottled the beer yet, so this is just based on what we’ve heard.
  • You need clean bottles. Preferably brown. Ask your friends or your local pub. Or drink a lot of beer, which ever you prefer.
  • You need caps and a capper. Any homebrew supply store will sell these. We already had some from Roberto’s previous brewing experiments.
  • The bottles also need to be cleaned and sanitised. You need a bottle brush, some washing up liquid and the same sanitiser that was used earlier.

I believe this is pretty much everything. I might have forgotten something. If that’s the case, please comment, and I’ll fix the post. Of course you can spend a lot more money on better equipment, but we’ve proven, that beer can be made with these. In my opinion it’s important just to get started, you can always invest more on your hobby later. Of course, if money is not an issue for you, just go ahead and splurge.

Happy brewing!

Anni